

I remember growing up one of my favorite toys to play with was my play kitchen. I used to pretend to make so many meals and organize all of my food in its own place. It was definitely my most used and loved toy for so many years! I knew I wanted this to be Jolie’s first birthday gift. Even though she may not be able to use imaginative play just yet, she has still loved to play with it and all of the pretend food.
If you look for a wooden neutral play kitchen, you’ll find most of them range between $400-600. Although some of them look nice we couldn’t even think of paying that for a toy. I found this ikea play kitchen while scrolling social media one day and when I looked it up I saw it was less than $100. After doing more research, I saw so many different pinterest diy projects and I just knew this was the one we had to get. It has good reviews and wasn’t too difficult to put together (according to James who built it while I supervised haha!)
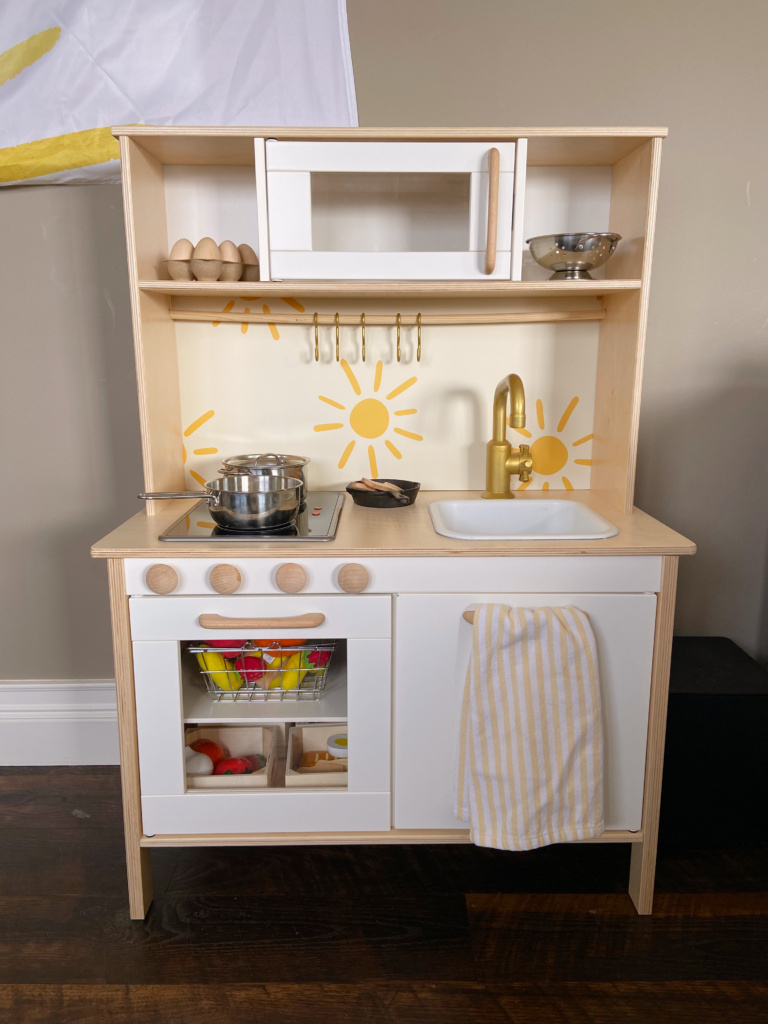
In this post, I’ll go through the steps we did to diy this into a sunshine themed play kitchen for our sunshine girl. Overall, it was less than $50 for all of the extra materials. I am so happy with how it turned out! When we first showed it to her, she smiled so big!
There are so many different ways to be creative with this kitchen, I pulled some inspiration from several different designs I saw on pinterest from others who have DIY’d their play kitchens to fit the design and aesthetic we were going for.

Materials:
– You can purchase the play kitchen HERE or at your local store (ikea link). We bought it through ikea but it is sold through other vendors if an ikea if not close to you or shipping is not available.
– Spray paint
- Rust Oleum Paint and Primer Satin White
- Rust Oleum Paint and Primer Vintage Gold
- Rust Oleum Matte Clear Enamel
Step 1: Organize
The first thing I did was figure out what we would be doing to the kitchen before starting to build. There were a few things that needed to be done before, during and after.
Next, I opened up the box and sort through the many pieces and take out what I was going to spray paint (the faucet, sink and hooks). Also took out the pieces we would not be using (plastic round dowel, pull handles and feet).
Step 2: Paint
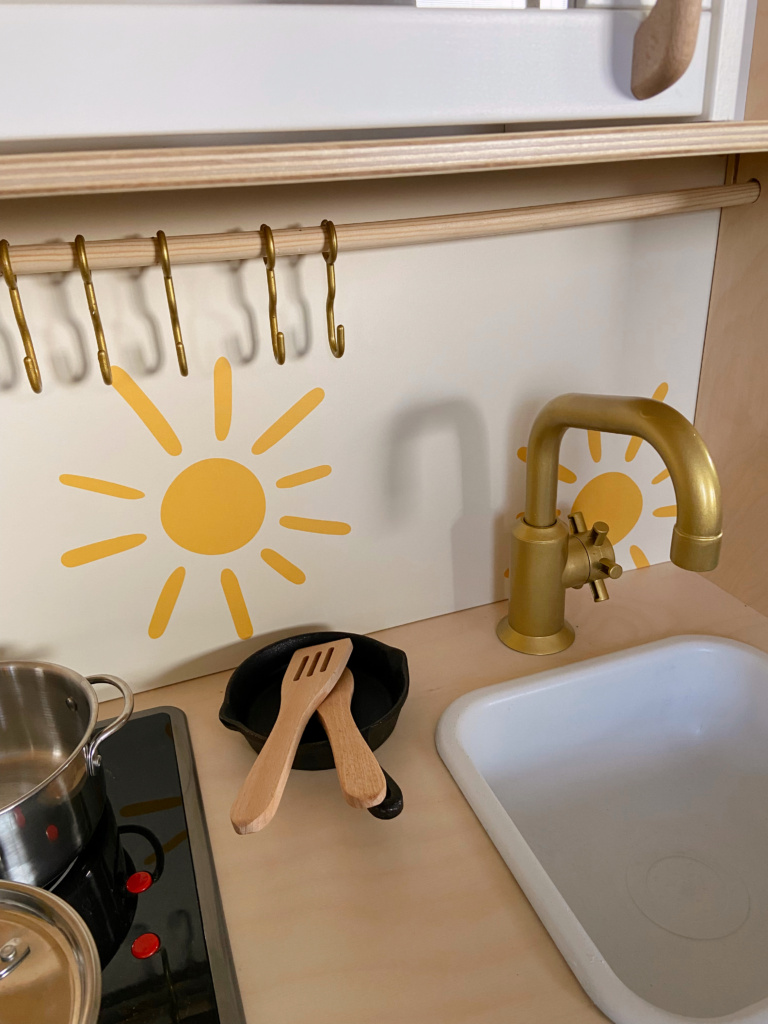
Spray painting took a total of 4 days. I painted the faucet gold, waiting a day in between each pass (3 total) then on the fourth day sprayed it with the clear enamel to protect it from chipping. Same with the sink but with white, 3 total passes, waiting a day in between each, then a coat of clear enamel.
I only sprayed the hooks once on each side, waiting a day before flipping them over to let them dry. Then on the third day, I sprayed it with the clear enamel.
Step 3: Build & Assemble
James was able to start building the kitchen while I was painting because the pieces I was painting were only going to be attached at the end. He just followed the instructions and they were pretty straightforward.
The sink does just sit in the counter, so I recommend either super gluing it in or under mounting it to keep it in place.
The ikea kitchen comes with 3 gray handles. Instead of spray painting them, I wanted to find some wooden ones to match the knobs on the oven. I found these on amazon that fit perfectly!
The knobs are just so she can pretend to turn on the oven. We just used wood glue to put them on evenly spaced under the stovetop.
Step 4: Backsplash
The last step was installing the backsplash. The kitchen is open at the back but I wanted to have a little fun with it and add some sunshine. We got this cheap hardboard and cut it to the size we wanted (top of kitchen to counter). 26.75 x19.5 in
Then, we applied the sunshine wallpaper per the instructions. I wanted as many suns to show up in the opening so we played around with the placement of it before sticking it in place. I loved this wallpaper because the suns were cute and you could choose a background and suns color from so many different options. (I chose cotton as the background and spice for the suns).
Final step was to screw the board in place.

There are still a few things I am waiting on and I am still having fun looking around for different accessories to add to it (more pretend food, utensils, decor and maybe rug/standing mat?) but at least the actual kitchen is built and functional!
I hope you found this guide helpful and are able to create a play kitchen that you can make & that is inexpensive! What I love about ours is that we are most definitely not the best pros at DIY projects and were able to do these little changes and it a lot less money than most play kitchens on the market.
Thanks for reading! xo